Resolve an Inquiry
When resolving an Inquiry, you can:
View the Field definitions list for more information.
Resolve an Inquiry assigned to you
- Select your Inquiry from the My Inquiries tab of your dashboard.
- Select Quick Actions.
- Select Resolve Inquiry.

- Complete the form.
Implementations: Pay special attention to the Validation Date. The Validation Date lets clients know when they can test and validation any changes.
Resolution guidance provides detailed information regarding each resolution option.
- Select Resolve.
When you resolve the Inquiry, InquiryPoint automatically creates a comment in the
(Notes) tab that says Resolution note - followed by your resolution notes.
Resolve an Inquiry assigned to someone else
-
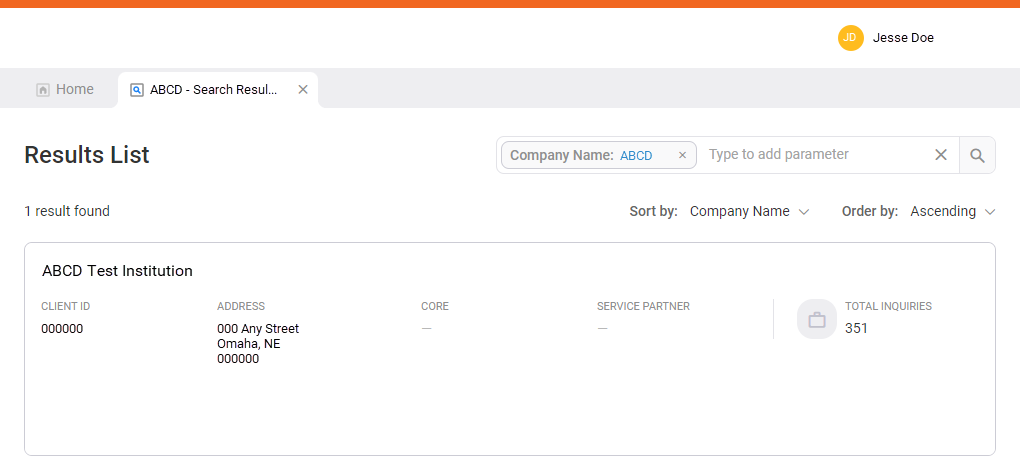
Perform a search for the identifying information of your Inquiry. For example, contact name, company name, email, or other parameters.
 View How to search for a client
-
Select the Type to add parameter search bar.
-
Select the Client Name parameter.
Use the Client ID search parameter to search for the client LOGO. -
Enter the text for which you are searching within that parameter.
You can search using wildcard functions. For example, enter *MyFinancial before pressing Enter or selecting Search.InquiryPoint retains your search parameters. This is helpful if you use a preferred grouping of parameters for every search. However, you can unintentionally narrow the results if you do not review all parameters before performing a new search. -
Repeat steps 2-3 for all parameters you want to use to refine your search.
-
Select
 (Search). Search results appear in a separate tab named by your query text followed by "- Search Results."
 -
From the search results, select the matching client record.
-
-
Select the Inquiry from the Inquiry List.
Select Maximize to widen your view of the Inquiry Details. -
Select View Details from the Inquiry Details pane on the Inquiry Information tab.
-
Select Quick Actions.
-
Select Resolve Inquiry.
Resolve inquiry only appears for an Inquiry in an assignment group to which you belong. If you do not see the option to resolve the Inquiry, assign the Inquiry to yourself and submit the update to see this option. -
Complete the form.
Resolution guidance provides detailed information regarding each resolution option
-
Select Resolve.
When you resolve the Inquiry, InquiryPoint automatically creates a comment in the
(Notes) tab that says Resolution note - followed by your resolution notes.

Bulk resolve inquiries
The Bulk resolve tab will automatically be shown or hidden based on user permission. If you do not have permission to bulk resolve, contact your network administrator.
Perform the following steps to bulk resolve:
1. Select the Bulk resolve tab on your home screen.
2. Enter the inquiry number or incident number in the search bar within the tab.
If the Implementation tab has any results, this tab displays by default. Select Others to see the results in that tab.
3. Select the check box next to the first inquiry you want to resolve.
4. Select the check box for additional inquiries you want to resolve. If you want to resolve all the inquiries on your screen, select the Select All button.
5. Select Resolve.
6. Fill out the appropriate fields in the Resolve Inquiry dialog box and then select Resolve.If you need to make any changes, close the dialog box.
7. Select Resolve in the Confirm Resolve Inquiry dialog box if you are sure you want to bulk resolve the inquiries. If you are unsure, close the dialog box to go back to the previous step.
All of the inquiries will then display the status "Resolved".
Field definitions
- Inquiry caused by
-
What event happened to cause the client to submit the Inquiry? Options include:
-
Client transaction processing / account maintenance
-
How to use / general product platform question
-
Outage / incident issue
-
Post implementation issue
-
Post release issue
-
Other
-
- Resolution code
-
Why have you chosen to resolve the Inquiry? Options include:
- Resolved - Fiserv
- Resolved - Client/Other
- Unresolved - No Response
- Unresolved - Non Inquiry Resolution.
For more information about Inquiry Resolution codes, view the reference page for Resolution Guidance.
- Root cause category
-
What caused the event that triggered the client to create an Inquiry? Options include:
- Question: The client was looking for information.
- Issue: The client experienced a problem with our product.
- Request: The client wanted us to perform a task for them.
After you select a root cause category, subcategories will appear. - Validation Date
-
The date when clients can test and validate changes.
Change this field only if you are part of an implementation. - Resolution notes (client visible)
-
Describe the resolution in as much detail as possible.
Resolution notes are visible to the client. - First contact resolution (FCR)
- Select this option if you were able to solve this Inquiry in one session.
- Inquiry complexity
-
Inform future associates of how complicated this issue was to resolve. Options include:
-
1 - Basic : Takes 30 minutes or less to resolve, including any time spent with the client.
-
2 - Medium : Takes 30+ minutes over 1-2 days due to additional research or multiple sessions needed with the client.
-
3 - Complex : Requires multiple parties and multiple troubleshooting sessions over an extended period of time.
-
- Complexity comments
-
Inform future associates of how complicated this Inquiry was to resolve.
Complexity comments are not visible to the client. -
Resolve Inquiries with AI Assist
InquiryPoint now gives you suggestions to help you resolve inquiries. Use the new AI assist tool to see likely resolutions, instructions about the additional details you might need to request, and similar inquiries and Knowledge articles related to the inquiry.
Watch the video below for an interactive overview of AI Assist.
How to use AI Assist
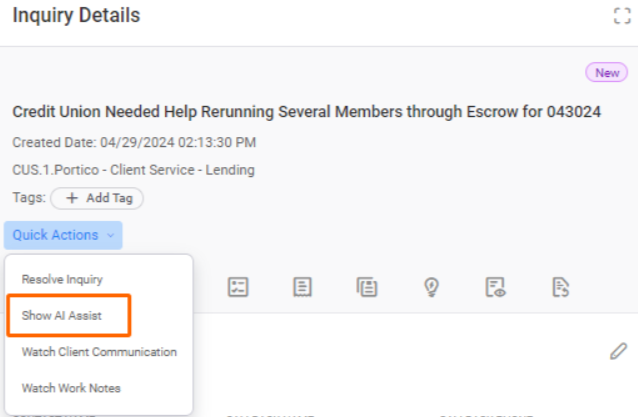
-
While working on an inquiry, expand the Quick Actions list.
-
Select Show AI Assist.
-
A new tab opens with three sections that contain suggestions to help you resolve the Inquiry.
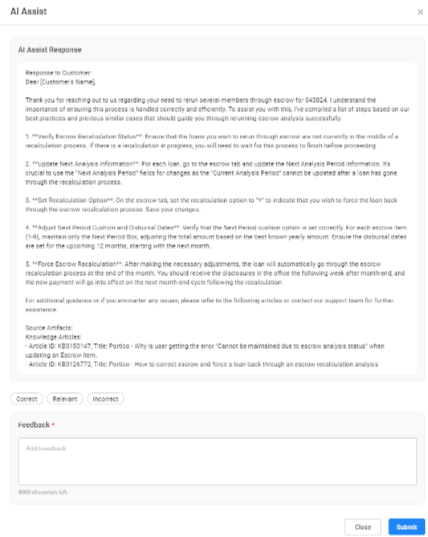
AI Assist Response
Mave examines the Inquiry, then looks for similar inquiries. Based on the resolution notes from the inquiries and the Knowledge Articles the resolver attached, she creates a possible resolution for you.
Review Mave's suggestion for accuracy and completeness and tailor it as needed to the specific inquiry you are resolving. Add any additional information required to fully resolve the inquiry. You can then either resolve the inquiry using Mave's suggestion or add it as a Comment/Work note.
Resolve the Inquiry using Mave's suggestion
-
Select Adopt and update to Resolve Inquiry.
-
Complete the Resolve Inquiry form. Notice that the system automatically entered Mave's suggestion as the resolution notes.
-
Select Submit.
Use Mave's suggestion as a Comment or Work Note
-
Select Adopt and update as a Comment/Work Note.
-
On the Notes tab of the Inquiry, select the Note Type.
-
Select Submit.
For more information on Comments and Work Notes, view the Work with Notes How to page.
Additional Information (Associate Details)
Mave examines the inquiry to help you determine the next steps to take. She can tell you who to contact and what to ask for in a step-by-step list.
Source Artifacts
Mave looks for similar inquiries and related Knowledge Articles to determine the probable resolution and additional steps. She provides links to the inquiries and Knowledge she used in the Source Artifacts section. You can review each item if you want more details.
-
-
After you review Mave's suggestions, scroll down to the bottom of the window and select Close.
-
Provide feedback to help us make Mave's suggestions better.
-
If you used any of Mave's suggestions or plan to, select I copied the answer I needed.
-
If you were not able to use any of the information Mave provided, select I didn't find what I was looking for.
The Feedback section is permission-driven. If your administrator has not given you permission to provide feedback, you will not see this section within AI Assist.
-
-
Select Submit.
-